

Seeker FAQs
Our spatial biology experts have created a list of frequently asked questions (FAQs) to provide answers about Seeker technology, which enables whole-transcriptome spatial mapping of fresh-frozen tissues at industry-leading resolution. Learn how to generate high-quality sequencing libraries with spatial and transcriptomic information using a fast, flexible workflow.
FAQs
Getting started
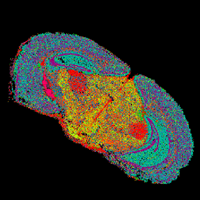
What is the Seeker spatial transcriptomics kit?
The Seeker spatial transcriptomics kit is the first high-resolution, whole-transcriptome, spatial mapping kit enabling researchers to map and analyze the spatial gene expression of tens to hundreds of thousands of cells on a single tile.
What is the spatial resolution of the Seeker tile?
The spatial resolution is 10 µm. This is achieved via 10 µm beads that are tightly packed together on the tile.
Does the Seeker spatial transcriptomics kit require any specialized hardware or instrumentation?
No. You only need the standard tools found in a typical molecular biology lab, such as heat blocks, thermal cyclers, and access to an Illumina sequencer.
Sample types and preparation
How long does the Seeker workflow take?
The Seeker workflow takes about 8 hr from tissue melting through library prep. The actual hands-on time is about 2–3 hr.
How large is the Seeker tile?
There are two tile sizes:
- 3 mm x 3 mm
- 10 mm x 10 mm
What kinds of tissue and sample types can I use with the Seeker spatial transcriptomics kit?
Fresh-frozen samples are compatible with the Seeker kit.
The kit is compatible with tissues from all species without any further optimization of the protocol (i.e., no permeabilization optimization). This is because the assay involves neither tissue fixation nor tissue permeabilization.
How thick should my tissue sections be for the Seeker tile?
Tissue sections for the Seeker tile should be 10 µm thick.
Why is the CryoCube overlay needed for Seeker tissue sections? Is it essential to the Seeker assay workflow?
The CryoCube section (30 or 60 µm) is melted on top of the 10 µm tissue section after it is melted onto the tile.
The CryoCube overlay improves this assay in three different ways:
- It keeps the tissue attached to the tile.
- It prevents the tissue section from drying out. An exposed section runs the risk of drying out, which could make the tissue harder to remove from the tile.
- It reduces lateral diffusion of mRNA. Failure to use the CryoCube covering may lead to more noise in the data and to mRNA leaking outside of the tissue region, especially around the borders of the tissue or air pockets (e.g., lung alveolar sacs).
For these reasons, the CryoCube overlay step is essential to achieve high-quality data.
Assay protocols and recommendations
What modifications do I need to make when using the Seeker kit with plant tissue?
As more customers run the Seeker kit with various plant tissues, we will update this FAQs page with any additional information, but the following tips help increase the chance of success.
- Make sure to start dissociation soon after tissue sectioning (i.e., within 1–2 hr after sectioning, without freezing the tile). Freezing the tile and tissue together (between Steps 12 and 13 of Section B on the protocol) and keeping it at –80°C for a couple of days may make it very difficult to dissociate.
- Incubate the tile with tissue clearing reagents for 60 min instead of 30 min.
Do I need to make any adjustments for running human heart tissue?
The standard Seeker kit is optimized for processing mouse heart tissue. For human heart tissue, we recommend trying the following adjustments to the standard protocol:
- Increase hybridization time to 30 min.
- Increase reverse transcription time to 90 min.
- Run 13 cycles of PCR in the second stage of cDNA amplification.
If I have low cDNA concentration, how do I re-amplify it?
Measure the concentration by Qubit quantification. If it is too low, re-amplify the cDNA.
- Create a cDNA master mix according to the table below.
Component 1 reaction cDNA Amp Buffer 25 μl cDNA Amp Primer Mix 2 μl cDNA Amp Enzyme 1 μl Nuclease-Free Water 22 μl–(X μl of cDNA)
Example: 22 μl – 5 μl cDNA = 17 μl Nuclease-Free Water
cDNA input All remaining cDNA (recommended) Total 50 μl - Mix well by pipetting.
- Briefly spin down the PCR tube.
- Run the following PCR program.
Temperature Time Cycles 98ºC 2 min 3–6 cycles* 98ºC 20 sec 67ºC 20 sec 72ºC 3 min 72ºC 5 min 4ºC Hold Choose the number of cycles most appropriate for your sample (e.g., if you have very little cDNA, run closer to 6 cycles).
- Vortex the SPRI beads and add 30 µl to each of the tubes (0.6-fold volume of the reaction mixture).
- Vortex to mix for 10–15 sec.
- Incubate at room temperature for 5 min.
- Briefly centrifuge the tubes and place the tubes on the magnetic rack. Once the solution is clear, carefully remove and discard the supernatant.
- Keeping the tubes on the magnetic stand, add 200 µl of 80% ethanol.
- Wait 30 sec, then remove and discard the supernatant.
- Add 200 µl of 80% ethanol.
- Wait 30 sec, then remove and discard the supernatant.
- Briefly spin the tubes to consolidate the remaining ethanol.
- Place the tubes back on the magnetic rack, then remove and discard the remaining ethanol.
- Let the SPRI beads dry at room temperature until the beads appear matte (~1–2 min). Be careful not to overdry.
- Remove the tubes from the magnetic rack and add 10 µl of Nuclease-Free Water to each tube to elute. Pipette the beads to mix well and incubate at room temperature for 1 min.
- Place the tubes on a magnetic rack and incubate for 1 min.
- Transfer the supernatant to new 0.2 ml PCR tube(s).
- Quantify the cDNA products using Qubit 1X dsDNA High Sensitivity Assay Kit and a Bioanalyzer or TapeStation system, following the manufacturer’s guidelines.
Do you need to optimize the permeabilization step in the Seeker protocol?
There is no permeabilization step, so no optimization is required. This is one of the major advantages of Seeker technology. The Seeker kit works on any species or tissue without requiring changes to the protocol.
What if my library has indications of PCR-bubble formation?
Sometimes, tissue with low RNA quality or very low cellular density can result in a final library TapeStation profile that includes a very long PCR-bubble product on the trace (see example below).

Example TapeStation D5000 electropherogram results after cDNA amplification and purification.
To fix this, you have two options:
- Option 1: Re-run the tagmentation reaction with fewer indexing PCR cycles. Run 8–9 cycles instead of the recommended 12 cycles. If this does not work, try Option 2 below.
- Option 2. Run a reconditioning PCR protocol using the library as template. See instructions below.
Component 1 reaction Tagged library product 2.5 μl Index Primer F (from Seeker Dual Indexing Primer Kit v2, Cat. No. K006) 2.5 μl Index Primer R (from Seeker Dual Indexing Primer Kit v2, Cat. No. K006) 2.5 μl Nuclease-Free Water 10 μl Nextera® PCR Master Mix (NPM) 7.5 μl Total 25 μl - Mix well by pipetting.
- Briefly spin down the PCR tube.
- Run the following PCR program.
Temperature Time Cycles 72ºC 3 min 3 cycles 95ºC 30 sec 95ºC 10 sec 55ºC 30 sec 72ºC 30 sec 72ºC 5 min 4ºC Hold - Proceed with the same library cleanup and quantification steps in Section V.I, "Library Cleanup and Quantification" in the Seeker 3x3 Bundle V1.1 User Manual.
Sequencing and data analysis
How can I convert my Seeker data from FASTQ pairs to an expression matrix and spatial coordinates?
You can easily perform this conversion using the Seeker Primary Analysis Pipeline.
What is the Seeker Primary Analysis Pipeline?
The Seeker Primary Analysis Pipeline reconstructs a spatial map of gene expression from FASTQ files generated by sequencing the Seeker libraries. Additionally, it performs quality control to help users determine their next steps.
How do I run the Seeker Primary Analysis pipeline?
You can either install the analysis pipeline locally on your server or an HPC (High-Performance Computing) server and run it via the command line, or run it in our online Takara Bio Spatial Bioinformatics Portal.
How do I gain access to your online bioinformatics portal?
You can follow the instructions to gain access on our Takara Bio Spatial Bioinformatics Portal.
What are the minimum system requirements for local installation of the Seeker Primary Analysis Pipeline?
Minimum system requirements:
- 256 GB RAM
- 64-core CPU
Which computational environments are compatible with the Seeker Primary Analysis Pipeline local installation?
Compatible environments include:
- Single-server workstation
- HPC SLURM
- HPC SGE
- AWS
Seeker Spatial Transcriptomics Kit
Enable whole transcriptome, spatial mapping of fresh frozen tissues at industry-leading resolution.
Seeker protocol videos
Watch how to produce sequencing-ready libraries with spatial information from fresh-frozen tissues.
Takara Bio USA, Inc.
United States/Canada: +1.800.662.2566 • Asia Pacific: +1.650.919.7300 • Europe: +33.(0)1.3904.6880 • Japan: +81.(0)77.565.6999
FOR RESEARCH USE ONLY. NOT FOR USE IN DIAGNOSTIC PROCEDURES. © 2025 Takara Bio Inc. All Rights Reserved. All trademarks are the property of Takara Bio Inc. or its affiliate(s) in the U.S. and/or other countries or their respective owners. Certain trademarks may not be registered in all jurisdictions. Additional product, intellectual property, and restricted use information is available at takarabio.com.
